
Welcome to my world of Sn3 Scale Model Railroading

Building Ponderosa Bakery
By
Tom Troughton, MMR
| This structure began as a Banta Modelworks, "Silver Plume Bakery" kit but I'm calling it the, "Ponderosa Bakery." It's located in the mountain community of Tall Timbers on my Cimarron and Tall Timbers layout. It's a laser cut wood kit and required moderate kit building skills. | ||
 Photo 1. Unlike other Banta Modelworks structure kits which use an inner box or shell of thin plywood on to which the builder attaches bass wood or stripwood pieces, the basic shape of this building is made with the bass wood or laser cut window panels. The rear and half of one side wall are made of bass wood panels. The front and other half of one side wall were intricately fabricated with small bass wood pieces and laser cut window frames. The dark colored trim pieces are large, "peel and stic," laser cut elements. These trim pieces were reinforced with AC adhesive. |  Photo 2. This is the clear plastic material used for window glazing. It's about .035" thick and is easily cut with an x-acto knife and comes with a protective layer of cellophane on each surface. Once cut and sized to the window opening, it's held in place with AC adhesive, being extremely careful not to get any on the glazing. | |
 Photo 3. I needed to increase the area around the front windows to use the thicker glazing material. A recessed area was created by carefully removing a small portion of the bass wood wall. A piece of the plastic glazing can be seen in this photo. |  Photo 4. With the newly cut recess, the edge of the glazing is hidden by the laser cut window trim. | |
 Photo 5. Rather than using the thin plywood ceiling panel, I used a piece of 1/8" thick, untempered Masonite, gluing it in place before installing the front door components. |  Photo 6. Another piece of the untempered Masonite was cut and fitted into the bottom of the back room of the building. It will eventually be secured to the supplied floor, but not to the building. The building will be, "keyed," or held in place over this piece of Masonite. | |
 Photo 7. The front door unit is actually constructed as one piece, with the clear glazing holding everything together. The plastic spans the joint between the doors and is held in place with the, "peel and stic," adhesive and dots of AC adhesive. |  Photo 8. Once again, when viewed from the front, the edge of the glazing is hidden, presenting a realistic view. | |
 Photo 9. The same technique of inserting the glazing was used on the side lights to the door unit. A portion of the interior layer of plywood was carefully removed to provide the "recessed area". Also note that scale 1 x 2 battens have been glued to this side wall using the laser scribed lines as guides. |  Photo 10. The plastic glazing helped strengthen these fragile elements. | |
 Photo 11. This inverted view shows that the two side light window units for the front door were glued in place with their joints reinforced with a prepainted piece of 4 x 4 strip wood. There also was a tiny space between the top of these units and the ceiling of the entry way that I filled with scrap pieces of the "peel and stic" trim material. |
 Photo 12. After the side window/front door component was firmly secured in place, the door assembly was glued to them. AC adhesive was applied to all the joints and a "fillet" of yellow glue was added to any remaining gap on the interior side to reinforce the joint. | |
 Photo 13. An interior door was added to the inner wall. The wall had a laser cut opening for a door, but none is supplied in the kit. I don't know if the prototype had a door or just an opening, but I added a door I found in my, "extra parts," bin. |  Photo 14. Here is a view of the front door assembly after all the components have been glued in place. It's quite rigid and solid because of the extra reinforcement I added above the door and side lights. | |
 Photo 15. The two supplied bass wood floor panels were glued together with yellow glue. The piece of untempered Masonite I cut earlier for the rear portion of the building was glued in place on top of the two bass wood floor pieces. |
 Photo 16. The small level roof has been secured in place as well as one of the long roof panels. Both the sloped roof pieces will be permanently attached to the building. One of the two bass wood roof formers was used after it was modified before being secured in place. | |
 Photo 17. A notch was cut in the roof former to support for the cast metal chimney. |  Photo 18. Before the former was glued in position, a thin piece of 4 x 4 strip wood was glued along the roof seam to reinforce that joint. Satisfied with the location and position of the chimney casting in the notch, the modified former was glued in place on the underside of the roof panel. | |
 Photo 19. The chimney was just set in place for this picture. The end trim boards were cut and glued in place also. The tiny battens that were glued over the laser scribed lines are seen better in this photo. |  Photo 20. While test fitting the bass wood cap pieces, I had a problem fitting the piece on the short wall with the one on the long one. | |
 Photo 21. I solved the problem by cutting a new cap from a piece of bass wood scrap. |  Photo 22. I also noticed a problem with the corbel supports on the side wall. There wasn't enough supporting material on the trim pieces applied earlier. | |
 Photo 23. Small pieces of the plywood were cut, painted and glued under the corbels to simulate the supporting boards. |  Photo 24. The roof was tackled next. Prior to gluing the roof panels in place, I used an X-acto knife to scribe alignment lines on them. The line closest to the bottom edge on each panel was marked at the 3' from the bottom edge. All the other lines were made 2'8" from that first line to allow for a 4" overlap of the roofing material. | |
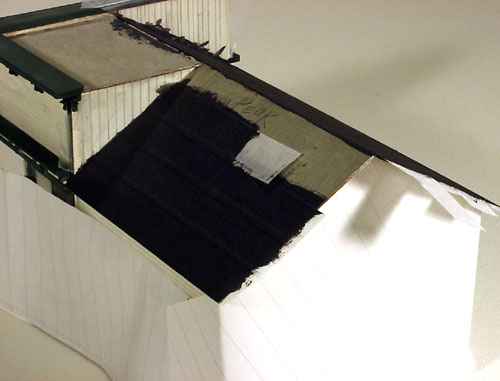
 Photo 25. The long roof panel was tackled first. This picture actually shows the second application of roofing material. Silk Span tissue paper was cut to a scale 3' width and bonded in place with Polly Scale Tarnished Black paint. To prevent the Tarnished Black paint from spotting the previously painted cream colored walls the building was masked with scrap paper and cellopane tape . |  Photo 26. This wadded up mess is all that remained from my first roofing attempt. I used the adhesive backed material supplied in the kit and did not like its appearance. It was carefully removed and Silk Span material was used instead. It still needs to be trimmed from the roof panels. | |
 Photo 27. The parting line on the chimney was carefully removed with the edge of a knife blade. It was then scrubbed with an abrasive cleaner and thoroughly rinsed. I used Polly Scale Santa Fe Red as a primer and followed it up with Folk Art Red Oxide and a final wash with very diluted white. When dry, the casting was fastened to the inner support with 5-minute Epoxy. Additional Epoxy was carefully applied around the base of the chimney at the roof line and when it had hardened, it was painted with glossy black to represent roofing tar. |  Photo 28. I like to set my buildings on a flat base rather than trying to nestle them down into the ground cover. A piece of brown colored tempered Masonite was cut slightly smaller than the outline of the side and back walls. I left extra material across the front and part of the side to support a wooden boardwalk. | |
 Photo 29. The strip wood was first colored with an alcohol and black shoe dye mixture then trimmed to a 6' length. The tiny strips were then glued to the Masonite with yellow Elmer's glue. |  Photo 30. Powered artist's chalks were used to add weathering to the chimney, roll roofing, side walls and board walk. | |
 Photo 31. To put the building in a realistic location on the layout, I temporarily set it across from the recently completed Amitrano's Dry Goods shop. It will eventually be situated in another part of town. |  Photo 32. A sign was created with a computer, then glued to a thin piece of aircraft plywood and mounted over the front door. The interior detailing is still missing, but it will be a good place to use the shelving and counter units once offered by Banta Modelworks. About the only thing that I won't be able to accurately duplicate is the aroma of fresh bread baking in the ovens. | |