
Welcome to my world of Sn3 Scale Model Railroading

BuildingThe Depot At Chama
By
Tom Troughton, MMR
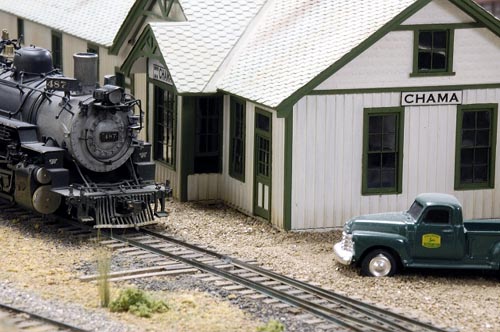
 I recently had a chance to construct a Chama Depot kit for Jack Walton. Unlike the other depots I've constructed over the past several years, this one was going to be painted in the white and green colors that the D&RGW used prior to the end of service at Chama. Jack had sent me an Internet address, http://www.rrart.com/prints/htdocs/chamadepot.html, for me to see a photo of a John Coker painting that I could use as a guide. The above scene is similar to John's painting except I substituted engine No. 487 and a newer truck because I didn't have a model of a blue 1939 Chevy pick-up. |  First off, I'm not going to go through the details of building the basic structure. The building was a kit designed and available from PBL and manufactured by Bill Banta of Banta Modelworks. An inner supporting structure is built up first, then exterior laser cut panels and trim were added next. In this instance, the interior structure was built up and spray painted with Krylon Gray Primer paint. When dry, it was lightly sanded to remove the small amount of, "fuzz," that was created. Prior to attaching the exterior wall pieces, they were brushed painted with regular Sanding Sealer, and when dry, lightly sanded to remove it's, "fuzz," too. Going through those steps produced a smooth surface for the, " 3-M - "Positional Mounting Adhesive #568," that I used to attach the exterior wall pieces to the inner shell. Other than in this instance, the only other adhesives I used on this structure were, "5-Minute epoxy," and "Aleene's Tacky Glue," that I purchased at a craft store and, "Lightning Bond," CA adhesive that I acquired from Paul Dougherty of, "Rickety Rails." |
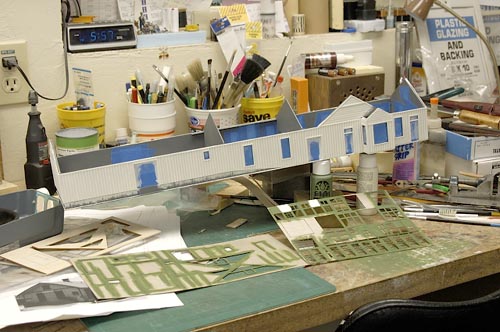
 Unlike the desk of Bill Adkins that was shown in a recent PBL ad, mine normally isn't as neat as shown here. Somewhere in that mess is a 6" x 6" clear working area which is usually all I need to build something. The rest of the space is used for storage. Once the exterior pieces were attached, I masked off the window and door openings with blue painter's tape, then brush painted the exterior with Folk Art, "Ivory White," craft paint. |  The laser cut wooden doors, windows and building trim pieces were brush painted with Folk Art, "Clover," craft paint. |
 The painted doors and windows were made up and secured in place with the, "Lightning Bond," adhesive. One thing that I noticed after doing this step was the glossy-like sheen where the CA ran out on the surface of the siding. These areas were carefully repainted with a fine pointed brush and the appropriate colored paint. Had I been more careful when I was applying the CA, I probably wouldn't have had to do so much, "touch-up," painting. A feature of the rear wall that needed modifying was the freight door near the passenger section. The kit was designed so that either a large, multi-pane window or a freight door could be used. Jack wanted the freight door option, even though this back side of the building wouldn't normally be seen when it's in place on his layout. Unfortunately, I couldn't find the freight door in the kit so one was fabricated from spare parts. Because I was building this structure for someone else, I also didn't want to worry about the windows and doors working loose over time, so I reinforced the CA bonds by carefully brushing a thin coating of Matte Medium completely around all their edges. |  I made the roof completely removable in case Jack ever wanted to add an interior or simply install some lighting fixtures. The kit was initially engineered so that the main roof could be removed, but since the little roof section over the bay window area was an integal part of the design, something more had to be done. |
 Additional roof supports were cut from the carrier sheets so that the separate piece of bass wood which comprised the left roof panel over the bay window section could be firmly attached to the larger roof component and allow everything to lift off together. |  Before adding the shingles, two additional supports were cut out of scrap bass wood to serve as gluing platforms for the metal chimney castings. |
 The roof panels had alignment line burned into them to aid in applying the laser cut paper shingles. Rather than butting their course ends together at the, "gutter," between the main roof and the, bay window section, I left a small gully for them. A thin piece of the shingle carrier sheet was glued lengthwise along the seam to represent the metal flashing material. |  Here's a better view of the laser cut paper shingles. They were attached in place, one course at a time, with, "Aleene's Tacky Glue." |
 With all the shingles firmly glued in place, they were brush painted with Folk Art, "Italian Sage," craft paint. A small stiff bristle brush was used to apply the paint which was then further brushed into place with an old soft bristle tooth brush. When the paint was dry, a sharp #11 Xacto knife blade was used to cut through the shingles covering the laser cut chimney holes. The castings were test fitted to make sure they fit tightly, but still allowed enough room to be aligned vertically. The painted castings were then glued in place by carefully placing a dot of, "5-Minute Epoxy," onto the chimney support platform installed earlier, then carefully pressing the casting through the hole into the epoxy. A small machinists square was used to make sure everything was vertical. When firmly secured in place, additional epoxy was worked in around the base of the casting between it and the shingles. Testors, "Glossy Black," paint was then painted on the epoxy to represent roofing tar. |  With the shingles in place, the previously painted laser cut trim pieces were attached with CA. |
 This view shows the trim pieces installed, along with the chimney and its seam sealing, "tar." |  With the roof in place, it's easy to see the interesting details in the wall siding as well as in the laser cut trim over this front portion of the passenger end of the depot. |
 The support for the platform was made up of interlocking laser cut bass wood strips, which were faced with laser etched bass wood pieces. Their joints were first bonded with, "tacky glue," but because the underside of the building might become dampened if it was sceniced in place on the layout, I wanted to make sure things stayed together. The joints were further reinforced with the , "Lightning Bond," CA. |  To add additional protection and further, "waterproof," the bottom of the structure, I gave everything a couple of coats of satin finish Polyurethane. |
 With the supports for the loading platforms secured in place, the thin, laser scribed plywood decking was stained with an alcohol and black shoe dye solution before it was glued in place. |  The surface edge of all the decking that touched the building needed to be sanded slightly in order for it to fit under the exterior siding. |
 A small piece of strip wood was added to represent a threshold for all the baggage doors. Also as is evident in this photo, the roof trim still needed to be touch up to cover the brush strokes that went astray when I was painting the shingles. |  Once both the front and rear platform decking pieces were in place, the end piece was installed. It was made from two shorter pieces by matching up their scribe lines to maintain the board spacing. |
 Station signs with printed frames, milage and elevation information were created on my computer using Adobe Photoshop Elements 2, then printed out on matte surfaced presentation paper. They were then glued to 1/64" thick aircraft plywood with the, "tacky glue," trimmed to the printed frame line then glued to the front and ends of the building with another drop or two of the, "tacky glue." |  The final step to the process dealt with weathering the building. Jack did not want the building to show a lot of wear and tear from the elements, so a light brushing with the powder made by rubbing various sticks of soft pastel earth tone chalks onto a piece of sand paper helped create that effect on the decking and the building sides. |
 Additional rust colored chalk powder was used to represent the discoloring of the roofing directly below both the chimney castings. |  Here's a view of the passenger end of the depot. A light dusting of tan colored chalk dust was brushed along the lower edges of the wall. |
 The building took several months to complete, not because it was difficult, but because my wife and I had a major house repainting and carpeting project running at the same time. As many of you know, I enjoy working on structures and I'm glad that this one will soon be installed on a good friends layout. | |
Click Here To Return To Railroad Home Page