
Welcome to my world of Sn3 Scale Model Railroading

Building
Amitrano's Dry Goods
By
Tom Troughton, MMR
| This is a photo essay of the construction of my, "Amatrano's Dry Goods Store," for the mountain community of Tall Timbers, CO. The "S" scale version of this laser cut wood & plaster kit was once produced by Banta Modelworks and marketed as, "Indian Trails Garage." The structure was originally designed as an "O" scale kit by Roger Malinowski as a combination cut stone and wood store with a wooden garage addition that he released in Portland, Oregon at the 1999 NNG convention. Roger's model was based partly on a building in Idaho Springs, Co. and a garage in Oklahoma. | |
 Photo 1. All the wood was stained with Sherwin-Williams Driftwood stain and sealed with sanding sealer. It then was dry brushed with Folk Art "White" prior to being assembled. I used the roof piece as a pattern to cut a floor from untempered Masonite. As planned, the kit suggests building the structures as one unit, but I decided to make two separate structures instead. The, "store," portion normally would have been butted up against the rear of the wooden garage, but since it was now a "stand alone" unit, it needed a rear wall. |  Photo 2. An inner supporting wall was also cut from the Masonite material and covered with three scrap pieces of lap siding left over from the kit, being careful to align the siding spacing as they were glued in place. Once secured in place, they too were painted to match the rest of the building. |
 Photo 3. A door for the rear wall came from my scrap box and strip wood framing pieces were added to frame it in place. |  Photo 4. The rear wall is now in place and the three window/wall units have been glued to the floor. A scrap piece of the 1/32" plywood was run from the top edge of the window panels to the back wall to serve as a guide and support for the removable roof I planned to install. |
 Photo 5. The four wall components of the store are now assembled, but the trim pieces along the roof and the vertical strips between the windows have not been added yet. Small scraps of strip wood were used to fill the void created by the angled upper wall pieces. |
 Photo 6. There are three beautifully carved wall plaster castings in the kit. They were carefully squared up and spray painted with Krylon's, "Almond Satin," and set aside to dry. This photo shows the long wall that's part of the, "store," unit. |
 Photo 7. "Quick Clamps," with their rubber bumpers were used to assemble these kits. Here they are holding the walls of the garage portion as the glue is setting up. |  Photo 8. Clothes pin clamps were used while attaching the trim pieces along the top edge of the store walls. Look closely and you'll see the tips of the clamps have been narrowed to reach into tighter places. |
 Photo 9. Additional pieces of strip wood have been added along the top edge of the window panels to aid in supporting the removable roof panel. I also had to fabricate a new, "notched," front right corner from additional bass wood scraps because of a problem with the original notched component. |  Photo 10. The end grain of the wall layers was hidden with pieces of painted and weathered strip wood. |
 Photo 11. The inner walls and floor were painted while I still had easy access to the interior. However, I didn't like the effect of the paint on the walls so I used CADRail 7.12b to draw interior board walls and a rear door. |  Photo 12. I drew the horizontal boards 10" wide and 12' long, then printed them out as a continuous 3-wall unit on index card stock paper. After test fitting and cutting away the window opening, I covered the rear surface of the wall paper with double-faced tape from Macklanburg-Duncan and carefully secured it in place. I left the long wall loose until the plaster wall was permanently attached. |
 Photo 13. The rear wall is now firmly glued in place with the wall paper secured to it, but the short vertical trim pieces along the front still need to be added. The interior wall effect on the printed paper is easily seen through the front windows. | < Photo 14. This overhead view also shows how the wall paper is situated. |
 Photo 15. The stone wall of the store were brush painted with various colors of, "Folk Art," brand acrylic craft paint before being attached to the building. They will eventually be dusted with chalks and powered plaster to blend them together. |  Photo 16. The windows were glazed with single pieces of clear plastic that I found in the framing section of a Hobby Lobby store. Both surfaces were protected with cellophane which was easily removed once the panels were cut to size. |
 Photo 17. After the glazing panels were test fitted, they were glued in place with, "Pliobond," adhesive. |  Photo 18. The thin plywood roof was made to be removed to gain access to the interior for detailing. |
 Photo 19. Short pieces of strip wood were fastened at the rear of the roof to simulate trim. They also provide a, "gripping," edge to remove the roof panel. |  Photo 20. The roof panel was sprayed with Krylon's, "Ultra Flat Black," paint after roofing paper lines were scribed into it with an Xacto knife. |
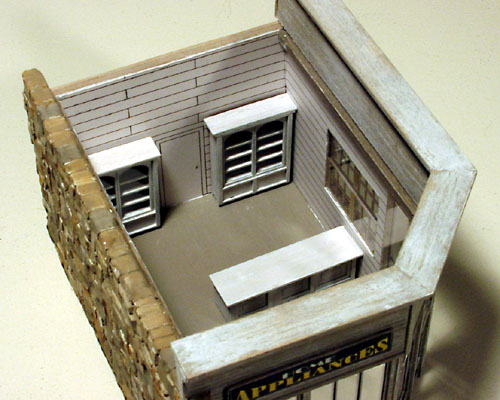
 Photo 21. I added a few of the really nice looking and easy to assemble Banta Modelworks shelve and counter units to the interior. They will eventually become filled with various pieces of merchandise and bolts of colored cloth. |  Photo 22. I'll eventually add a merchant and some customers to the shop along with a cash register and wrapping paper roll on the front counter. |
 Photo 23. The signs were included with the kit. I mounted them to a scrap piece of 1/32" plywood and glued them into position on the lap siding exterior. |  Photo 24. Besides the, "Coca Cola," sign, the building might also end up with some circus posters or even the familiar, "Uncle Sam Wants You," poster. |
 Photo 25. The nearly finished building is just about ready for placement on the layout. The facial trim boards have finally been attached, but it's still waiting for the main shop name to be installed. |  Photo 26. The garage portion of the kit was definitely the easier of the two units to construct. It consisted of two laser cut wall components and the two plaster castings for the side walls. I had to scribe end and inner wall joint lines between the stones. Once again, Folk Art paints were used to color them. |
 Photo 27. The interior was strengthened with short pieces of square strip wood. During the construction process, I handle these quite a bit and have been known to "crush" a building in the blink of an eye. |  Photo 28. Taking that previous statement one step further, the doors were "locked" in their closed position with stout backing boards to prevent them from being opened inward during handling and placement on the layout. Real glass from 35mm slide mounts was used to glaze the window panels in the doors. |  Photo 29. This underside view of the rafter ends show how they are represented by short pieces of laser cut plywood. Their locations are laser scribed on the underside of the roof, making gluing them into position an easy task. I used tweezers and white Elmer's glue to fasten them in place. |  Photo 30. After deciding where the new store would go on the layout, I cleared away the previously installed scenery. |
 Photo 31. A Masonite base was added and the boardwalk plank glued directly to it. The base is slightly smaller to allow the walls of the structure to overhang the edge by about 1/32". |  Photo 32. The next series of photos show the building situated at the end of my Railroad Avenue scene. This part of town is fairly flat, but there is a slight incline for the residents to climb as they visit the shops along the way. |  Photo 33. This view shows the building located directly across the square from the Wagon Shop and Blacksmith. The ground cover is still wet from the glue and water application. |  Photo 34. I removed the Blacksmith's Shop and replaced it with the garage portion of the kit, just to see how it would look. I'm not sure where it will end up being located on the layout. |
 Photo 35. The Dry Goods store is located along the line of stores on Railroad Avenue. Looks like someone has parked their brand new tractor in front of Murphy's General Store to run in for supplies. |  Photo 36. I decided to call the store, "Amitrano's Dry Goods," in honor and recognition of my friend and fellow Sn3 modeler, Steve Amitrano. Eventually, I'll add figures of Mr. Amitrano talking to some shoppers, when he's probably telling them about the latest material he's ordered from back East. They should be looking forward to him having it on display in a couple of weeks. I hope you enjoyed this description of how I constructed the building. I apologize for it being so long, but I wanted to show you as many of the steps as possible and also let you see the great details provided in the kit. |